Sunday, January 27, 2019

Installing and registering IQService

To install and register the IQService, do the following:
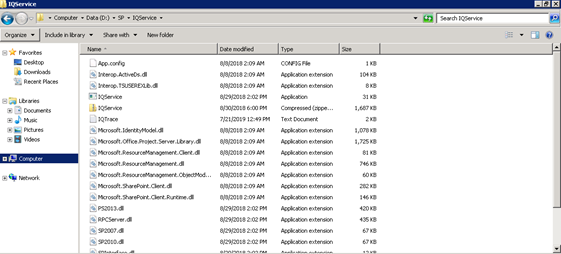
1. Create a directory D:\ IQService in the windows server to copy the IQService.zip file
2. Copy the IQService.zip file from the IdentityIQ installation into this directory. The IQService.zip file is located in identityiq_home/WEB-INF/bin/win where identityiq_home is the directory in which the identityiq.war file is expanded
3. Expand the IQService.zip
 4. Run IQService.exe -i -p 5050 to install a Windows service named IQService
   Give a different port if 5050 is already in use
5. Run regedit and traverse to following path to set the log related attributes
 HKEY_LOCAL_MACHINE\SOFTWARE\SailPoint\IQService. 
The following keys are used:
1. port - port on which to listen
2. tracefile - path to the trace file
3. tracelevel - 0 (off), 3 (verbose)
4. maxTraceFiles - maximum number of trace log files
5. traceFileSize: maximum file size of a trace file in bytes
 
6. Open the SailPoint IQService-Instance from the services and change the Log On to the service account (Domain\ServiceAccountName)
 
 7. Start the service from the Windows Services Applet or from the command line by running IQService.exe -s

Saturday, January 12, 2019

Sailpoint IdentityIQ 7.3 Installation


Overview


This document walk you through a sandbox (local-machine) installation of IdentityIQ version 7.3. The sandbox install demonstrated here is not suitable for a production environment. Refer to the IdentityIQ Hardware Sizing Guide for guidance on the right installation architecture for production environments.


Before Installing check the certification Matrix @ Supported Component Details


Download all your installed package

  1. Java JDK 1.8_172
  2. Apache Tomcat version 8.5.31
  3. Identity IQ 7.3
  4. Oracle DB Instance up and running

Installing Java


  1. Create a directory /opt/sp/java/
  2. Copy the “jdk-8u172-linux-x64.tar.gz” file in above created directory
  3. Unpack the tarball and install Java "tar -zxvf jdk-8u172-linux-x64.tar.gz"
  4. Delete the .tar.gz file if you want to save disk space."rm -rf jdk-8u172-linux-x64.tar.gz"

Installing Apache


  1. Create a directory /apps/sp/
  2. Copy the “apache-tomcat-8.5.31.tar.gz” file in above created directory
  3. Run the command “tar xvf apache-tomcat-8.5.31.tar.gz” this will unpack the tarball in above location and create the folder “apache-tomcat-8.5.31” and will copy the required apache file in the folder.
  4. Remove the “apache-tomcat-8.5.31.tar.gz” file by running the command "rm apache-tomcat-8.5.31.tar.gz"

Installing Sailpoint


  1. Download “identityiq-7.3.zip” and unzip the file in local machine
  2. Create a directory identityiq inside the apache folder “/apps/sp/apache-tomcat-8.5.31/webapps/”
  3. Copy the identityiq.war file unzipped in step 1 to “/apps/sp/apache-tomcat-8.5.31/webapps/identityiq”
  4. Run the below command to unwar the war file jar -xvf identityiq.war
  5. Create the database schema follow below 6-9 steps
  6. Navigate to /apps/sp/apache-tomcat-8.5.31/webapps/identityiq/WEB-INF/bin
  7. Enter iiq schema to create the schema
  8. Create the database table using the above schema
  9. Change to the /apps/sp/apache-tomcat-8.5.31/webapps/identityiq/WEB-INF/database directory oracle> source /apps/sp/apache-tomcat-8.5.31/webapps/identityiq/WEB-INF/database/create_identityiq_tables-7.3.oracle
  10. Configure Database Settings that IdentityIQ will use to connect to its repository  - vi /apps/sp/apache-tomcat-8.5.31/webapps/identityiq/WEB-INF/classes/iiq.properties


11. Import the default IdentityIQ objects to init and init-lcm the system
$ chmod +x /apps/sp/apache-tomcat-8.5.31/webapps/identityiq/WEB-INF/bin/iiq
$ /apps/sp/apache-tomcat-8.5.31/webapps/identityiq/WEB-INF/bin/iiq console -j

Using JLine
> import init.xml
> import init-lcm.xml

12. Start Apache Tomcat and test login page via a browser.

Navigate to /apps/sp/apache-tomcat-8.5.31/bin
Using the cmd ./startup start the apache

Login into the sailpoint http://:8080/identityiq/login.jsf