Showing posts with label Branding IdentityIQ. Show all posts

Saturday, January 12, 2019

Sailpoint IdentityIQ 7.3 Installation


Overview


This document walk you through a sandbox (local-machine) installation of IdentityIQ version 7.3. The sandbox install demonstrated here is not suitable for a production environment. Refer to the IdentityIQ Hardware Sizing Guide for guidance on the right installation architecture for production environments.


Before Installing check the certification Matrix @ Supported Component Details


Download all your installed package

  1. Java JDK 1.8_172
  2. Apache Tomcat version 8.5.31
  3. Identity IQ 7.3
  4. Oracle DB Instance up and running

Installing Java


  1. Create a directory /opt/sp/java/
  2. Copy the “jdk-8u172-linux-x64.tar.gz” file in above created directory
  3. Unpack the tarball and install Java "tar -zxvf jdk-8u172-linux-x64.tar.gz"
  4. Delete the .tar.gz file if you want to save disk space."rm -rf jdk-8u172-linux-x64.tar.gz"

Installing Apache


  1. Create a directory /apps/sp/
  2. Copy the “apache-tomcat-8.5.31.tar.gz” file in above created directory
  3. Run the command “tar xvf apache-tomcat-8.5.31.tar.gz” this will unpack the tarball in above location and create the folder “apache-tomcat-8.5.31” and will copy the required apache file in the folder.
  4. Remove the “apache-tomcat-8.5.31.tar.gz” file by running the command "rm apache-tomcat-8.5.31.tar.gz"

Installing Sailpoint


  1. Download “identityiq-7.3.zip” and unzip the file in local machine
  2. Create a directory identityiq inside the apache folder “/apps/sp/apache-tomcat-8.5.31/webapps/”
  3. Copy the identityiq.war file unzipped in step 1 to “/apps/sp/apache-tomcat-8.5.31/webapps/identityiq”
  4. Run the below command to unwar the war file jar -xvf identityiq.war
  5. Create the database schema follow below 6-9 steps
  6. Navigate to /apps/sp/apache-tomcat-8.5.31/webapps/identityiq/WEB-INF/bin
  7. Enter iiq schema to create the schema
  8. Create the database table using the above schema
  9. Change to the /apps/sp/apache-tomcat-8.5.31/webapps/identityiq/WEB-INF/database directory oracle> source /apps/sp/apache-tomcat-8.5.31/webapps/identityiq/WEB-INF/database/create_identityiq_tables-7.3.oracle
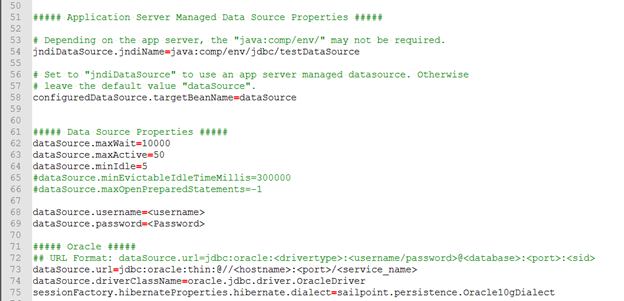
  10. Configure Database Settings that IdentityIQ will use to connect to its repository  - vi /apps/sp/apache-tomcat-8.5.31/webapps/identityiq/WEB-INF/classes/iiq.properties


11. Import the default IdentityIQ objects to init and init-lcm the system
$ chmod +x /apps/sp/apache-tomcat-8.5.31/webapps/identityiq/WEB-INF/bin/iiq
$ /apps/sp/apache-tomcat-8.5.31/webapps/identityiq/WEB-INF/bin/iiq console -j

Using JLine
> import init.xml
> import init-lcm.xml

12. Start Apache Tomcat and test login page via a browser.

Navigate to /apps/sp/apache-tomcat-8.5.31/bin
Using the cmd ./startup start the apache

Login into the sailpoint http://:8080/identityiq/login.jsf


Saturday, August 4, 2018

SETTING ENTITLEMENT PROPERTY - OWNER , DISPLAY NAME , DESCRIPTION , IS REQUEST-ABLE

A brief overview of Entitlement Attributes in SailPoint IIQ followed by instructions on how to configure or set the Entitlement Attributes of the application..


Click on the link for on-boarding the Delimiter (Flat File base connector) . Make sure the step given in the link are completed before setting the property of the Entitlement such as the owner , Role Name , Role Display Name and Entitlement is requestable.


1. Open the Account Group Aggregation Task which was used in previous post for loading the Entitlement for the Application


2.We need to write the logic for the Group Aggregation Refresh Rule (This Rule is will called before committing any change related to the Entitlement Task ) So what-even attribute which we want to set for the particular entitlement before committing the changes we have to write the BL here in this rule.


3. Save the Rule and Execute the Task.

4. Verify the entitlement from Entitlement Catalog and check the values are set.

5. We have written the logic in which we are reading the Entitlement Attribute present in the File and setting the Entitlement owner , Entitlement Display Name , Entitlement Description and whether the Entitlement is requestable or not .


Wednesday, July 18, 2018

Branding IdentityIQ - Image-based Branding Components

The application logos displayed throughout user interfaces are rendered from image files.for branding the image based component to modify the OOTB Sailpoint image to the Company logo follow the below steps mentioned.

1.  Navigate to //webapps/identityiq_home/ui/images


2. Modify below files as required


3. Navigate to //webapps/identityiq_home/images/icons
     Replace sailpoint.ico file with the new file


4. Restart the Application Server and make sure the Browser Cache is cleared.


NOTE:The easiest way to avoid problems with image scaling is to use a logo image which matches the dimensions of the default product logos so you do not have to change the image sizes.