Showing posts with label Identity Attribute. Show all posts

Saturday, August 31, 2019

Hiding Filter Attributes From Request Access , Manage Access Page Sailpoint Identity IQ


Hiding the Filter Attributes from the Request Access --> Manage Access Page using the Plugin .
We need to create the below folder structure and copy the required codes in each of the files as given below , here in expAccessSerachFilter.js we have written the JS to hide few OOTB Attributes such as the Role Type , Entitlement Attribute and Entitlement Owner. This can be even used to hide any of the Extended Attribute from the Managed Attribute.

│  
├───AccessRequestAccessFilter
│   │   manifest.xml
│   │  
│   ├───jars
│   └───ui
│       ├───images
│       └───js
│               expAccessSerachFilter.js


manifest.xml

<?xml version='1.0' encoding='UTF-8'?>
<!DOCTYPE Plugin PUBLIC "sailpoint.dtd" "sailpoint.dtd">
<Plugin name="AccessRequestAccessFilter" displayName="AccessRequestAccessFilter" disabled="false" version="0.0.1.0" minSystemVersion="7.1" maxSystemVersion="7.4"
  certificationLevel="None">
  <Attributes>
    <Map>
      <entry key="snippets">
        <value>
          <List>
            <Snippet regexPattern=".*" rightRequired="">
              <Scripts>
                <String>ui/js/expAccessSerachFilter.js</String>
              </Scripts>
            </Snippet>
          </List>
        </value>
      </entry>
    </Map>
  </Attributes>
</Plugin>


expAccessSerachFilter.js

jQuery(document).ready(function(){
var MutationObserver = window.MutationObserver || window.WebKitMutationObserver || window.MozMutationObserver;
var observer = new MutationObserver(function(mutations) {  
 mutations.forEach(function(mutation){
   for(var i =0;i < mutation.addedNodes.length;i++){
   if($("[id*='itemsFilterPanel']").length) {
    if(jQuery(mutation.addedNodes[i]).find("sp-object-suggest[sp-button-aria-label='Role Type']").length)
     {
      $("sp-object-suggest[sp-button-aria-label='Role Type']").parent().parent().parent().hide();
     }
    if(jQuery(mutation.addedNodes[i]).find("sp-object-multi-suggest[sp-button-aria-label='Entitlement Attribute']").length)
     {
      $("sp-object-multi-suggest[sp-button-aria-label='Entitlement Attribute']").parent().parent().parent().hide();
     }
    if(jQuery(mutation.addedNodes[i]).find("sp-object-suggest[sp-button-aria-label='Entitlement Owner']").length)
     {
      $("sp-object-suggest[sp-button-aria-label='Entitlement Owner']").parent().parent().parent().hide();
     }     
   }
   }
    });
 });
observer.observe(document,{childList:true,subtree:true,attributes:false});
});

create the zip folder with above structure and install the same as the plugin in UI. 
Login into Identity IQ --> Gear --> Plugins -->New -->Drag and drop a file or click in this box to install a plugin
Once we have installed logout and login and see the changes . Below UI shows and have hidden the required attributes.

Saturday, August 4, 2018

SETTING ENTITLEMENT PROPERTY - OWNER , DISPLAY NAME , DESCRIPTION , IS REQUEST-ABLE

A brief overview of Entitlement Attributes in SailPoint IIQ followed by instructions on how to configure or set the Entitlement Attributes of the application..


Click on the link for on-boarding the Delimiter (Flat File base connector) . Make sure the step given in the link are completed before setting the property of the Entitlement such as the owner , Role Name , Role Display Name and Entitlement is requestable.


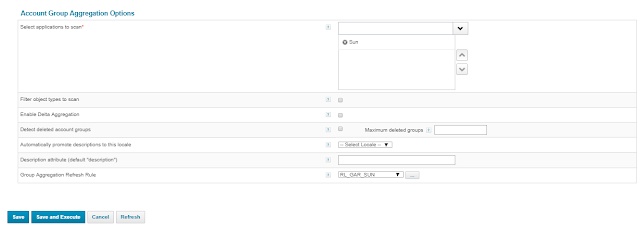
1. Open the Account Group Aggregation Task which was used in previous post for loading the Entitlement for the Application


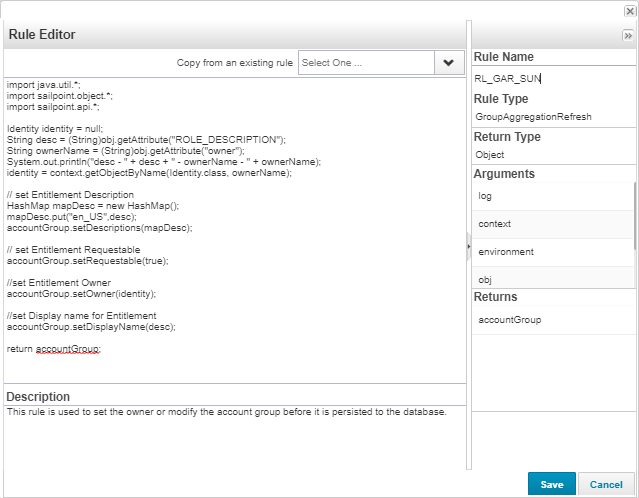
2.We need to write the logic for the Group Aggregation Refresh Rule (This Rule is will called before committing any change related to the Entitlement Task ) So what-even attribute which we want to set for the particular entitlement before committing the changes we have to write the BL here in this rule.


3. Save the Rule and Execute the Task.

4. Verify the entitlement from Entitlement Catalog and check the values are set.

5. We have written the logic in which we are reading the Entitlement Attribute present in the File and setting the Entitlement owner , Entitlement Display Name , Entitlement Description and whether the Entitlement is requestable or not .


Monday, July 16, 2018

CONFIGURING IDENTITY ATTRIBUTES IN SAILPOINT IIQ

Personal identity attributes / User Attributes are personal identifiers that are commonly used to distinguish one person from others. Examples include, but are not limited to, name, date of birth, social security number (SSN), and address. OOTB Sailpoint IdentityIQ IIQ comes with few sets of attributes , but most of the times we are required to extend the list of the Attributes , Here i have given the steps to add the more extended or custom attributes to the user or identity.


A brief overview of Identity Attributes in SailPoint IIQ followed by instructions on how to configure Searchable Identity Attributes.

      1.     Navigate to “identityiq_home\WEB-INF\classes\sailpoint\object”


2.     Add the Attribute details need to be extended as shown below


3.     Run Schema Extend Attribute to generate the sql command. (iiq extendedSchema)


    4.     Navigate to below path and check the file to see if the SQL commands are generated.identityiq_home\WEB-INF\database\add_identityiq_extensions.oracle

      5.     Run the cmd through SQL client to modify the SPT_IDENTITY Table


       6.     Adding Attribute to Identity Mapping and UI Config
1.     Log into SailPoint Identity IQ as an admin
2.     Click on System Setup > Identity Mappings
3.     Click New Identity Attribute
4.     Enter the attribute name and displayname for the Attribute
Attribute name should be same as the one given in (IdentityExtended.hbm.xml)
5.     Select any desired options (Multi-Valued, Searchable, Group Factory, Edit mode, etc.)
6.     Repeat step 5 for all mapped attributes
7.     Click OK


            1.    Log into SailPoint Identity IQ as an admin
2.     Navigate to the debug interface (http://localhost:8080/identityiq_home/debug/debug.jsf)
3.     Click on the UI Config button
4.     Modify the following entry:
<entry key=”identityViewAttributes” value=”name,firstname,lastname,email,manager“/>

5. Click Save


       7.     Checking for user attribute modification
Only Attribute which are set as searchable be set in the respective column.