1. Perform the steps to configure the Database/JDBC connector as mentioned in the link
2. Navigate to → Application → Rules → Provisioning Rule → Global Provisioning Rule, here we are writing the Rule to Perform the Create and Delete operation , Sample code is attached below

import sailpoint.object.ProvisioningResult;
import sailpoint.object.ProvisioningPlan;
import sailpoint.object.ProvisioningPlan.AccountRequest;
import sailpoint.object.ProvisioningPlan.AttributeRequest;
import sailpoint.object.Filter;
import sailpoint.object.ManagedAttribute;
import sailpoint.object.Link;
import sailpoint.tools.Util;
import sailpoint.api.IdentityService;
import java.util.List;
import java.util.HashMap;
import java.sql.PreparedStatement;
ProvisioningResult result = new ProvisioningResult();
if (plan != null){
List accountRequests = plan.getAccountRequests();
if (( accountRequests != null ) && ( accountRequests.size() > 0 )){
for(AccountRequest accRequest: accountRequests){
try {
System.out.println("Opeartion Requested: "+accRequest.getOperation());
if(AccountRequest.Operation.Create.equals(accRequest.getOperation())){
accRequest.setNativeIdentity(plan.getNativeIdentity());
PreparedStatement statement = connection.prepareStatement("INSERT INTO MARS(LANID) values (?)");
statement.setString(1, plan.getNativeIdentity());
statement.executeUpdate();
result.setStatus(ProvisioningResult.STATUS_COMMITTED);
}
if(AccountRequest.Operation.Delete.equals(accRequest.getOperation())){
accRequest.setNativeIdentity(plan.getNativeIdentity());
PreparedStatement statement = connection.prepareStatement("DELETE FROM MARS WHERE LANID =(?)");
statement.setString(1, plan.getNativeIdentity());
statement.executeUpdate();
result.setStatus(ProvisioningResult.STATUS_COMMITTED);
}
}catch (SQLException e) {
result.setStatus(ProvisioningResult.STATUS_FAILED);
result.addError(e);
}
}
}
}
System.out.println("returning the result: "+result.toXml());
return result;
4. Click on Application→ Provisioning Policy → Create a new policy and attach the same to the Create operation


5. Checking the Provisioning for the application , Navigate to → Manage Request → Account Request → Select the Identity for which Account need to be request
(Make sure the setting is done to make this application as requestable)


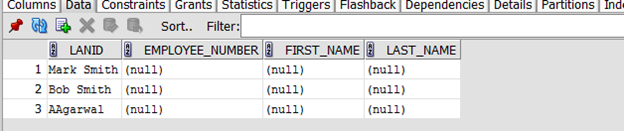
6. Checking the Database to validate if the Provisioning created the account for the Custom Application ,
Here we can see the Entry for the User is added to the Configured table
7. We won’t we able to see the Link until we run the Account Aggregation Task which we created in earlier post

8. Click on Save and Execute and Check the Result from the task Result Tab.
9. Navigate to Application → Application Definition → Accounts and see all the Accounts which are pulled from the DB.

10. Checking the linked Account to the Identity,
11. Navigate to Identity → Identity Warehouse → Select the Identity
Click on the Application Accounts to see the the Accounts if the Link Exists.

12 . Few Important point Noticed :
Link will be created only once the Aggregation Task is ran , ie if the Application is requested for create
Provisioning will be done at the End point , but no link can be seen on the Identity Cube .
Link will be deleted if the Application is requested to perform delete .
getSQL operation will work only once the link is present on the account.