Showing posts with label JBDC Connector. Show all posts

Saturday, August 3, 2019

FeaturesString Available in Sailpoint IdenityIQ


Connector Features Supported 


The Application object also has a Feature enumeration, specified as the FeaturesString attribute of the application definition, which is used to control the functionality available through the connector.it tell what all the operation idenityIQ is configured to support for this connector.

Below are the list of the value that are possible for the FeaturesString
Application. Feature
Description
ACCOUNT_ONLY_REQUEST
The application supports requesting accounts without entitlements.
ADDITIONAL_ACCOUNT_REQUEST
The application supports requesting additional accounts.
AUTHENTICATE
The application supports pass through authentication.
COMPOSITE
The application supports composite application creation.
CURRENT_PASSWORD
Some application types support verification of the current password
DIRECT_PERMISSIONS
The application supports returning DirectPermissions.
DISCOVER_SCHEMA
The application supports discovering schemas for users and groups.
ENABLE
The application supports reading if an account is enabled or disabled.
GROUPS_HAVE_MEMBERS
The application models group memberships with a member
attribute on the group object rather than a groups attribute on
the account object.
MANAGER_LOOKUP
The application supports looking up managers as they are
encountered in a feed.
NO_AGGREGATION
An application that does not support aggregation.
NO_PERMISSIONS_PROVISIONING
Indicates that the connector cannot provision direct or target
permissions for accounts.
NO_RANDOM_ACCESS
The application does not support random access and the getObject()
methods should not be called and expected to perform.
PASSWORD
The application can provision password changes.
PROVISIONING
The application can both read and write accounts.
PROXY
The application can serve as a proxy for another application.
SEARCH

SYNC_PROVISIONING
The application can provision accounts synchronously.
UNLOCK
The application supports reading if an account is locked or unlocked.
UNSTRUCTURED_TARGETS
The application supports returning unstructured Targets.
Below are the List of the featurestring value when we configure OOTB Active Directory Connector
featuresString
PROVISIONING
SYNC_PROVISIONING
AUTHENTICATE
MANAGER_LOOKUP
SEARCH
UNSTRUCTURED_TARGETS
UNLOCK
ENABLE
PASSWORD
CURRENT_PASSWORD

Saturday, May 25, 2019

Database - JDBC Application Configuration Using OOTB Connector - Provisioning

1. Perform the steps to configure the Database/JDBC connector as mentioned in the link
2. Navigate to → Application → Rules → Provisioning Rule → Global Provisioning Rule, here we are writing the Rule to Perform the Create and Delete operation , Sample code is attached below


3. Below is the Sample code


import sailpoint.object.ProvisioningResult; import sailpoint.object.ProvisioningPlan; import sailpoint.object.ProvisioningPlan.AccountRequest; import sailpoint.object.ProvisioningPlan.AttributeRequest; import sailpoint.object.Filter; import sailpoint.object.ManagedAttribute; import sailpoint.object.Link; import sailpoint.tools.Util; import sailpoint.api.IdentityService; import java.util.List; import java.util.HashMap; import java.sql.PreparedStatement; ProvisioningResult result = new ProvisioningResult(); if (plan != null){ List accountRequests = plan.getAccountRequests(); if (( accountRequests != null ) && ( accountRequests.size() > 0 )){ for(AccountRequest accRequest: accountRequests){ try { System.out.println("Opeartion Requested: "+accRequest.getOperation()); if(AccountRequest.Operation.Create.equals(accRequest.getOperation())){ accRequest.setNativeIdentity(plan.getNativeIdentity()); PreparedStatement statement = connection.prepareStatement("INSERT INTO MARS(LANID) values (?)"); statement.setString(1, plan.getNativeIdentity()); statement.executeUpdate(); result.setStatus(ProvisioningResult.STATUS_COMMITTED); } if(AccountRequest.Operation.Delete.equals(accRequest.getOperation())){ accRequest.setNativeIdentity(plan.getNativeIdentity()); PreparedStatement statement = connection.prepareStatement("DELETE FROM MARS WHERE LANID =(?)"); statement.setString(1, plan.getNativeIdentity()); statement.executeUpdate(); result.setStatus(ProvisioningResult.STATUS_COMMITTED); } }catch (SQLException e) { result.setStatus(ProvisioningResult.STATUS_FAILED); result.addError(e); } } } } System.out.println("returning the result: "+result.toXml()); return result;


4. Click on Application→ Provisioning Policy → Create a new policy and attach the same to the Create operation


5. Checking the Provisioning for the application , Navigate to → Manage Request → Account Request → Select the Identity for which Account need to be request

(Make sure the setting is done to make this application as requestable)


6. Checking  the Database to validate if the Provisioning created the account for the Custom Application ,  
Here we can see the Entry for the User is added to the Configured table


7. We won’t we able to see the Link until we run the Account Aggregation Task which we created in earlier post


8. Click on Save and Execute and Check the Result from the task Result Tab.
9. Navigate to Application → Application Definition → Accounts and see all the Accounts which are pulled from the DB.


10. Checking the linked Account to the Identity,
11. Navigate to Identity → Identity Warehouse → Select the Identity
Click on the Application Accounts to see the the Accounts if the Link Exists.


12 . Few Important point Noticed :

Link will be created only once the Aggregation Task is ran , ie if the Application is requested for create
Provisioning will be done at the End point , but no link can be seen on the Identity Cube .

Link will be deleted if the Application is requested to perform delete .

getSQL operation will work only once the link is present on the account.

Saturday, May 18, 2019

Database - JDBC Application Configuration Using OOTB Connector - Aggregation

1. Created the Custom Table Named “MARS”.
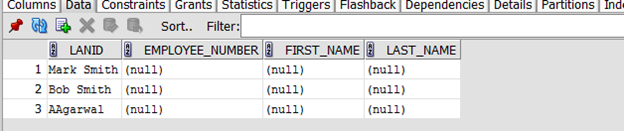
2. Below are the Details of the Custom Table which need to be Integrated for Provisioning and Aggregation.


 3. Select the Application Type as JBDC , Provide the Name , Owner and Application Type.


4. Click on Configuration → Setting  and Provide the JBDC Connection Settings and Query Settings.

5. Click on Test Connection and Check the Connectivity with the DB Which need to be Integrated.
6. Navigate to Schema ,and click on Discover Schema Attribute to Fetch all the Table column from the Database table provided to be managed.
7. Based on the Column which need to be managed , delete the unwanted column from the attributes list.
8. Modify Identity Attributes and Display Attribute based on the Requirement.


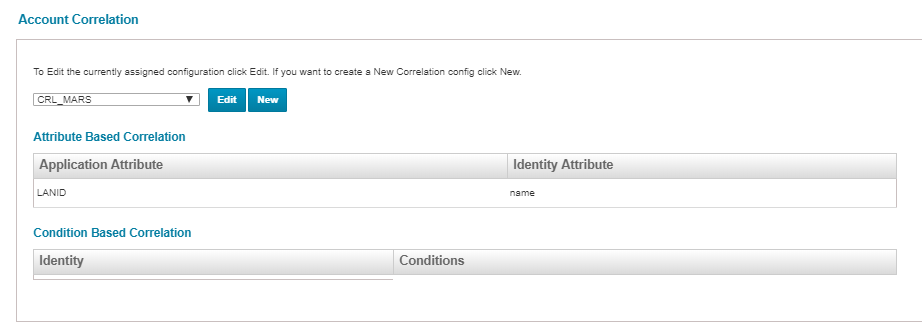
9. Navigate to Correlation and Add the Correlation Rule based on which the Account need to be Aggregated and link to the Identity.

10. Navigate to Setup and Click on Task , To create the Account Aggregation Task to Pull the Data from the Table.


11. Click on Save and Execute and Check the Result from the task Result Tab.
12. Navigate to Application → Application Definition → Accounts and see all the Accounts which are pulled from the DB.


13. Checking the linked Account to the Identity,
14. Navigate to Identity → Identity Warehouse → Select the Identity and Click on the Application Accounts to see the Accounts if the Links exists.